Why Need to Back Up Your iPhone?
Backing up your iPhone involves duplicating its data to another location. Before delving into methods on how to backup iPhone to iTunes on Windows PC, it’s crucial to grasp why individuals opt to back up their iPhones to Windows 10/11. Three key reasons are outlined below:
- Data Protection: Given the susceptibility of iPhone data to factors like virus attacks and factory resets. Having a duplicate stored on a Windows PC ensures swift data recovery.
- Space Optimization: When facing space constraints, transferring files from the iPhone to an external drive . Or a Windows PC becomes a practical solution, freeing up valuable space.
- Seamless Transition to a New iPhone: Upon acquiring a new iPhone, the ability to back up current iPhone data to a computer and subsequently restore it to the new device facilitates a seamless transition.
How to Make an iPhone Backup with iTunes on Windows
When you use iTunes to back up your iPhone data on Windows PC, you are compelled to back up nearly the entire data. Furthermore, the restoration process from an iTunes backup offers no flexibility. Allowing only the restoration of the entire content without the option for selective choices.
But anyway, iTunes is the official way to back up your iPhone. Here is how to do it:
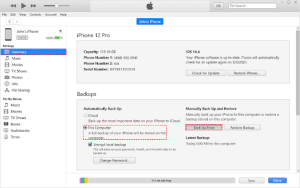
1: Begin by downloading the most recent version of iTunes on your Windows PC and establish a connection between your iPhone and PC using a USB cable.
2: Once iTunes identifies your iPhone, locate and click the phone-shaped icon situated near the top-left corner.
3: Select the Summary tab > Within the Backups section, select This Computer > Then, initiate the backup process by clicking the Back Up Now button.

If you select Encrypt local backups in the Backup section, be sure to remember the password you configured. As you will be prompted for it during the recovery process. In addition, if your drive C: does not have enough space for a full iPhone backup, you can move iPhone backup to external hard drive.
Bonus Tip: Alternative Way to Back Up iPhone to PC
FoneTool emerges as a viable alternative to back up your iPhone. This free and dependable iPhone management software not only addresses connectivity concerns. But also empowers users to designate their preferred storage path prior to initiating the backup process. Let’s delve into some noteworthy advantages:
- Full or Selective Backup Modes: FoneTool allows users to choose between a full or selective backup of their iPhone. In selective backups they can choose the specific types of data they want to include in the backup.
- Fast Backup Speed: FoneTool is optimized for efficient backup operations, ensuring that the process is fast and does not consume excessive time.
- Preview Functionality: FoneTool often includes a preview feature, allowing users to view and selectively restore specific items from the backup before completing the restoration process.
- Flexible Restoration Options: In addition to backups, FoneTool offers flexible options for recovering data to iPhone, giving users control over what they want to recover.
Moreover, FoneTool provides users with the convenience of back up iPhone photos to Synology NAS, ensuring that valuable memories are securely stored and accessible, even if their iPhone is lost or damaged. To back up your iPhone using FoneTool. You shloud install FoneTool for free on your PC and then follow the simple guide.
Part 1. Make a Full iPhone Backup Without iTunes
1: Link your iPhone to your PC, ensuring a trusted connection is established between the two devices.
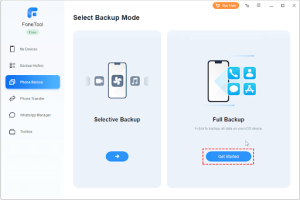
2: Locate FoneTool on your Windows PC > Choose the Full Backup feature and commence the process by clicking Get Started.

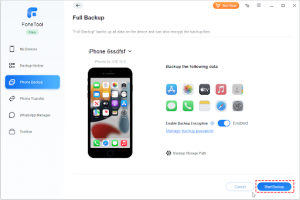
3: Enable Backup Encryption to protect your sensitive information > Choose a storage for your backup files > Then, click Start Backup to commence the procedure.

Part 2. Preview and Selectively Back Up Your iPhone [Recommended]
1: Use a USB cable to connect your iPhone to your PC > Open FoneTool, bringing you to its primary interface.
2: Locate and choose the Phone Backup option > Choose the Selective Backup mode and click the Get Started button.

3: Indicate the specific files you wish to backup and then proceed by clicking OK > Select the destination for your iPhone backups and click Start Backup.

The Bottom Line
To sum up, while iTunes serves its purpose for computer backups, a thorough comparison positions. FoneTool as the optimal selection for iPhone backups on Windows PC. This tool offers enhanced flexibility through its simple operation, allowing seamless backups to your PC or external hard drive. On top of that, FoneTool extends its usefulness with additional features, including the ability to convert HEIC to JPG and erase iPhone in preparation for resale without iTunes.


